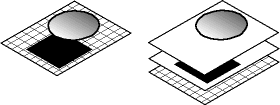
Layers divide a Fireworks document into discrete planes, as though the components of the illustration were drawn on separate tracing paper overlays.
Each object in a document resides on a layer. You can either create all layers before you draw, or add layers as needed. You can rearrange the stacking order of layers like you can rearrange the stacking order of objects on a single layer.

Note: The canvas is below all layers, but it is not actually a layer. For information on working with the canvas, see Changing document size, color, and resolution.
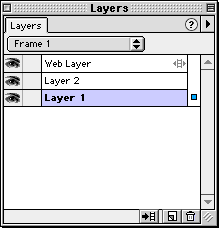
The Layers panel displays the current state of all layers in the current frame of a document. The name of the active layer is highlighted.

Layers panel
When you want to protect objects on all but the active layer from unwanted selection or changes, use Single Layer Editing. When Single Layer Editing is enabled, only objects on the current layer can be selected.
To add a layer:
| Choose New Layer from the Layers panel Options pop-up menu. | |
| Click the New Layer button. | |
| Choose Insert > Layer. |
To activate a layer:
| Click the layer name in the Layers panel. | |
| Select an object on that layer. |
Objects you draw, import, or paste initially reside on the active layer.
To name a layer:
| 1 | Double-click a layer name in the Layers panel. |
| The Layer Options dialog box opens. | |
| 2 | In the Name text box, type a new name for the layer and click OK. |
To delete a layer:
| Drag a layer to the Delete Layer button. | |
| Select a layer and click the Delete Layer button. | |
| Select a layer and choose Delete Layer from the Layers panel Options pop-up menu. |
To move a layer:
Drag a layer name up or down in the Layers panel. Moving a layer changes its stacking order.
Within a document, Fireworks stacks layers based on the order in which you created them, placing the most recently created layer on the top of the stack. The stacking order of layers determines how objects on a layer overlap objects on other layers.
To show or hide a layer:
Click the square in the first column to the left of a layer name.
An eye icon indicates that a layer is visible.
Note: Hidden layers are not exported.
To lock a layer:
Click the square in the second column to the left of a layer name.
A padlock indicates that a layer is locked. Objects on a locked layer are not editable.
To duplicate a layer:
| Drag a layer to the New Layer button. | |
| Select a layer and choose Duplicate Layer from the Options pop-up menu in the Layers panel. |
To move selected objects to another layer:
Drag the blue square to the desired layer.

To copy selected objects to another layer:
Hold down Alt (Windows) or Option (Macintosh) and drag the blue square to the desired layer.

To share a layer across frames:
| Double-click a layer, and then in the Layer Options dialog box choose Share Across Frames. | |
| Select a layer you want to share, and then choose Share Layer in the Layers panel Options pop-up menu. |
Note: If a layer is shared across all frames, when you update any object on that layer, the object updates in all frames.
To turn on or off Single Layer Editing:
| From the Layers panel Options pop-up menu, choose Single Layer Editing. A check mark indicates that Single Layer Editing is active. | |
| Deselect Single Layer Editing to turn off the option. |